STARSHIP - MD Portal User Guide 🚀
Account Setup
Upon logging in to Starship, you will be directed to the main dashboard page. It is important to review and set up your account before accessing other pages. To set up your account, click on the Settings button on the navigation menu.

- Fax Number: A unique fax number will be automatically generated for you by Starship. Anyone who knows your eFax number will be able to send you documents within the platform.
- Account Details Information: During the onboarding process, the Provider Success team will input your personal contact information. If some details are not available, placeholder information will be used. Please review each field to ensure accuracy.
- License/Billing Information: The Provider Success team will also input your license and billing information during the onboarding process. If some details are not available, placeholder information will be used. Please review each field to ensure accuracy.
After you have reviewed and/or updated your information, press the Save button to save and retain the information.

- Practice information: This section is used to keep a record of your practice information if you have an in-person clinic. When you begin the onboarding process, our Provider Success team will add your practice information. If there is any missing information, we will use placeholder information instead. It's important that you review each field for accuracy after we populate the information.
- Specialist information: This section enables you to select your specialty.
After you have reviewed and/or updated your information, press the Save button to save and retain the information.

- Appointment Preferences: You can select the types of appointments that suit you best. This will help our Patient Care Coordinators and our upcoming smart-matching feature to find the most suitable appointments for you and the patients. However, please note that selecting preferences does not guarantee that you will always get the exact type of appointment you prefer. Nevertheless, we will try our best to match your preferences.
After you have reviewed and/or updated your information, press the Save button to save and retain the information.

- Digital signature: To ensure the authenticity of digital forms that are created within Starship, you are required to provide your digital signature. Simply press the Update button to display the signature field and sign accordingly. Your signature will be displayed on all digital forms and will be used to verify the form's authenticity for the recipient.
Get Help


You can click the Get Help button at any time and on any page to access the Help Centre, which has help articles and answers to frequently asked questions. Inside the pop-up, you may use the Chat function to reach one of the Patient Care Coordinators. A small pop-up window will be displayed enabling you to enter your message.
Clinic Hours Setup
To schedule your availability or clinic hours, please press the "+" button. If you schedule your availability within the next 28 hours, it will need to be reviewed and approved by the Patient Care team. However, if you schedule it 28 hours or more in advance, Starship will automatically approve your hours.
In the event that you are unable to schedule your availability or unavailability, please contact the Patient Care team via the Get Help button and provide your details.

Homepage / Dashboard
- Overview: The section labeled "Overview" presents a list of your past and upcoming appointments. If you wish to check past appointments, simply tap on the date field and select the desired date.
- Submission: The "Submissions" section gives you access to a list of all submitted eForms via the Form Funnel feature. You can view the document within the platform or download it as needed.
- Results: The "Results" section provides a list of all incoming patient results or documents sent by external senders. You have the option to view the document within the platform or download it. Additionally, you can add notes to each incoming result.
Join a Virtual Appointment

Scheduled virtual appointments can be accessed by selecting a blue time slot on the Calendar page.

You can join your appointment by pressing the “Join Session” button.
Once you have joined the appointment, your browser may ask for permission to access your camera and microphone if you haven't already granted it. To ensure that the browser can display your camera and microphone, click on the "Allow" button to enable both options.

Press the “Join” button to join the virtual appointment with the patient.

On the right side of the screen, you can enter descriptions in the History, On Examination, Assessment, and Plan sections.
To end the appointment, you are required to select a disposition and then press the “END APPOINTMENT” button.

After pressing the “END APPOINTMENT” button, the system will display a pop-up requiring you to select one of the appointment statuses
- Complete: the appointment has been completed successfully with the patient. The system will ask you if you want to finalize your session notes.
- No-show: the patient did not show up for the appointment.
- Cancelled: the appointment has been cancelled either by the physician, or the patient. The system will ask you to provide a reason.
Form Funnel
The Form Funnel feature allows you to generate eForms and send them to recipients electronically after completing appointments. Each eForm transaction is tied to your personal eFax number. Press the “NEW FORM” button to display a list of available forms.


Send eFaxes Manually
If certain forms are not available through the Form Funnel feature, you can manually send them through the Send page. Simply choose the document, enter your recipient’s fax number, and press the “SEND FAX” button.

Viewing Patient Charts
Patient charts can be viewed by navigating to the My Patients menu. From there, you can find a patient’s personal information, medical history, notes made by other providers and staff members, and documents uploaded (e.g. requisitions, lab results, referral letters, etc.). To search for a patient chart:
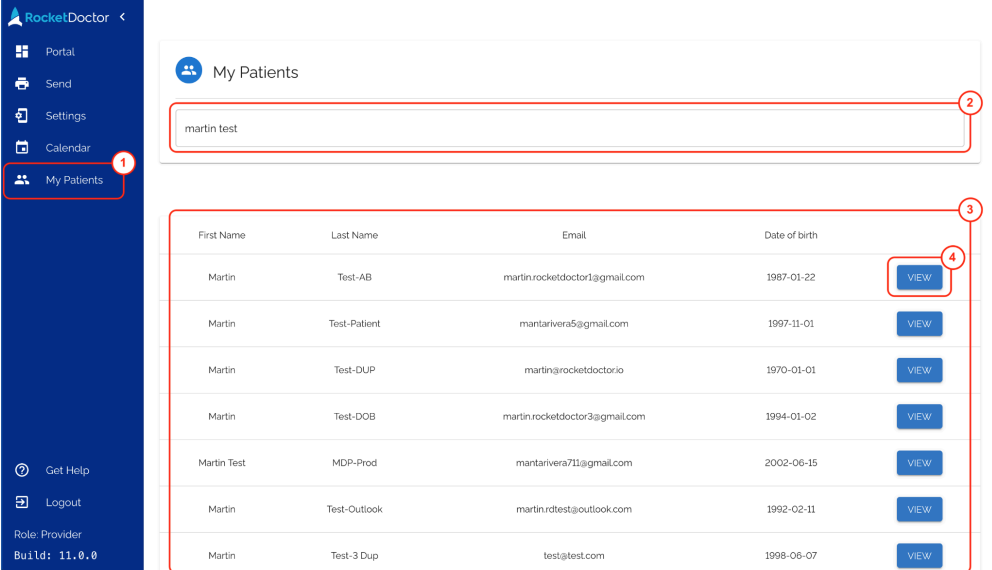
- Click on My Patients from the left sidebar.
- Enter the patient’s name or email address in the Search for patient text field.
- Search results will be displayed in this section. By default, it shows a list of a few patients.
- Select the View button for the patient you wish to view the chart of
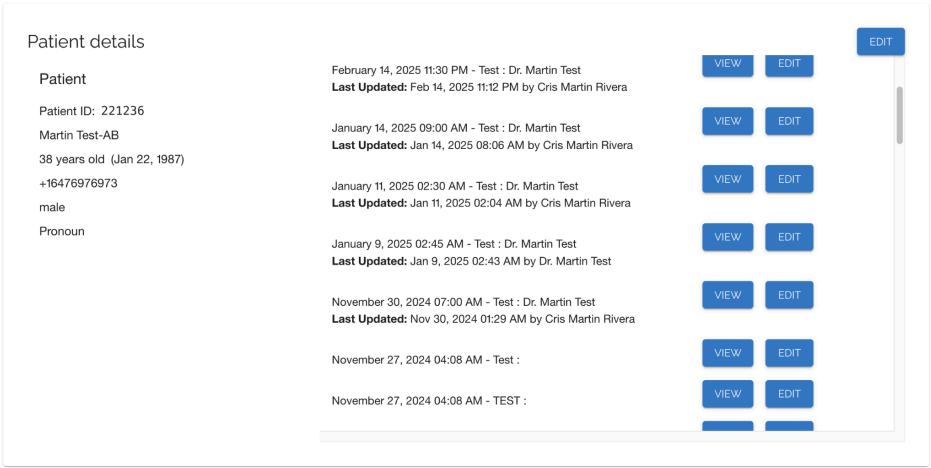
A patient’s chart has different sections:
Patient Details - Here is where you can find a patient’s personal information and edit them, as well as details of previous appointments. Click the View button to access appointment-specific notes
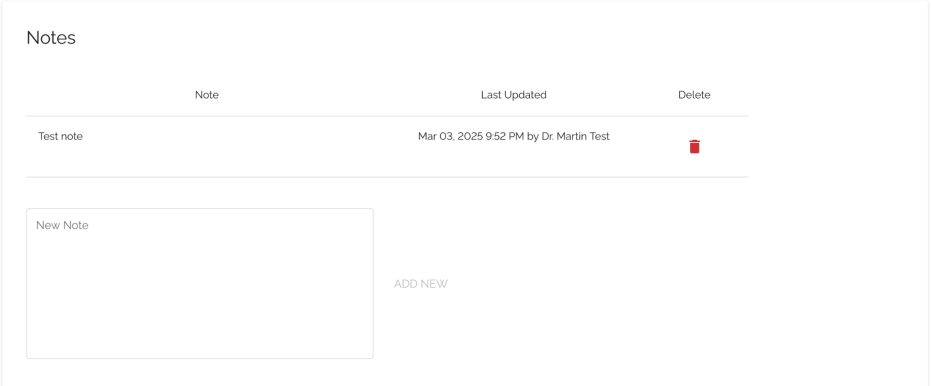
Notes - Any notes left by another provider (except appointment notes) or a staff member will be displayed here.
Insurance / Health Card - If applicable, this is where you can find and edit a patient’s health card details.

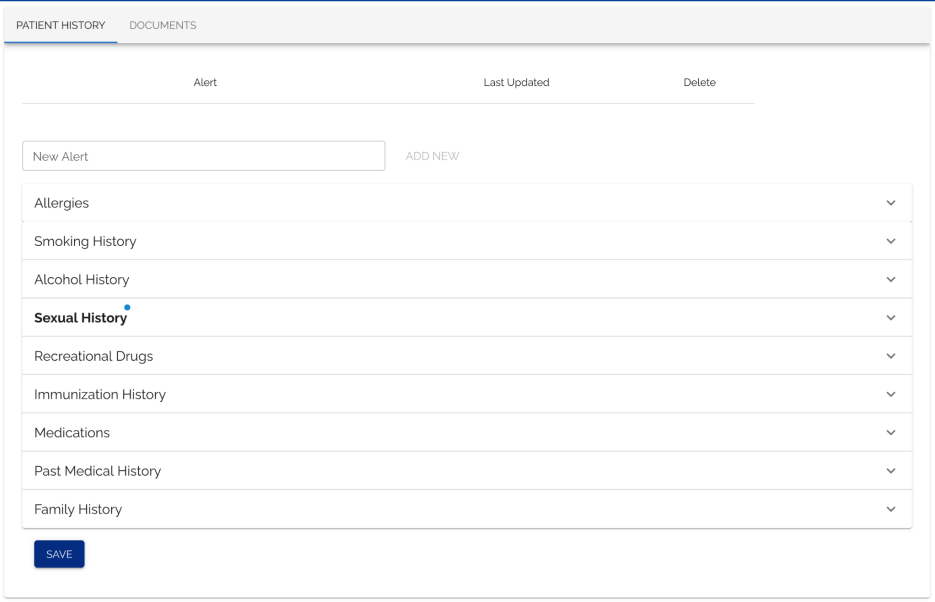
Patient History/Documents - Select medical history and chart alerts are under the Patient History tab, while documents can be viewed by switching to the Documents tab.